Guide · Tuya, Smart Life & other Wi-Fi devices Advanced
Get Tuya, Smart Life and other Wi‑Fi devices onto your TV
If you own Wi-Fi lights, plugs, switches or sensors from Tuya, Smart Life, or any of the hundreds of brands that resell their hardware, this guide should get them into Apple Home — and once they are in Apple Home, Theatrium can show and control them on your Apple TV.
Theatrium shows what is already in your Apple Home. So when a smart plug, blind, older bulb or camera never appears on the dashboard, it is usually because it never made it into Apple Home in the first place: the brand simply didn't build in HomeKit support. The fix is a free, well-established piece of software called Homebridge. There is also a fair chance you don't need it at all — four questions will tell you which.

 TheatriumOn your Apple TV
Open the Home app on your iPhone or iPad. What do you see?
It's the app with the orange house icon, built into every iPhone. If you can't spot it, swipe down on the home screen and search for "Home".
Is there smart-home kit in your house that isn't in that list?
Things you control with the manufacturer's own app rather than Apple's. These are the usual suspects:
Do you use Home Assistant?
Home Assistant is free software that runs on a small computer in your house and speaks to almost every smart-home brand there is. Theatrium works beautifully with it — and it's a bigger commitment than most people want.
Which computer in your home could stay switched on?
Homebridge is a small program that has to keep running — when it sleeps, those devices drop off your dashboard until it wakes. This one answer decides how easy the rest will be, so it's worth a moment's thought.
You don't need Homebridge
Everything you own is already in Apple Home, which is all Theatrium needs. If something still isn't appearing on the TV, it's almost always one of two small things rather than a missing bridge:
- The accessory has no room assigned. Theatrium builds the dashboard out of your Apple Home rooms, so anything roomless has nowhere to land. Fix it in the Home app.
- This Apple TV isn't a Home Hub yet, or is signed into a different iCloud account from your home.
You'll need to borrow an iPhone — once
Apple Home can only be set up and added to from an iPhone or iPad; there's no way to do it from the Apple TV or a computer. Homebridge is paired by scanning a code in the Home app, so you do need one of those in your hands.
The good part: it's a one-time job. Once Homebridge is paired and your accessories are in Apple Home, everything keeps working from the Apple TV alone. Borrowing a family member's iPhone for ten minutes is genuinely enough.
If that isn't practical, Home Assistant is the better path for you — it's set up entirely from a web browser on any computer, and Theatrium reads it just as happily.
Add the device to Home Assistant instead
You already have the more capable tool. Putting Homebridge in the middle would mean running two bridges to do one job, and every extra link is another thing to go wrong.
- In Home Assistant, go to Settings › Devices & services and add the integration for your device's brand. There are well over a thousand.
- In Theatrium, set your data source to Home Assistant. It finds your server on the network and fills in the address itself — you sign in by scanning a code with your phone, with no access token to create.
- You also get what only a server can give: history sparklines, who's-home, weather and system metrics.
Home Assistant or Homebridge?
Both will get your missing device onto the TV. They're aimed at different appetites, and it's worth picking deliberately rather than drifting.
- Home Assistant — a proper home server. Supports nearly every brand, and unlocks Theatrium's richest dashboard: history graphs, presence, weather, system metrics, media from any speaker. Expect an evening to set up, and it becomes something you tend to now and then.
- Homebridge — one narrow job, done well: it makes non-HomeKit devices appear in Apple Home. About thirty minutes, three pasted commands, then you can forget it exists. It won't give you history or presence, because Apple Home doesn't have them.
If the honest answer is "I just want that one plug on my TV screen", Homebridge is the right size of solution.
Homebridge on your Mac
This is the easiest version of this job. A Mac that stays on is an excellent host: pairing with Apple Home is reliable, which is the part that actually matters, and the whole thing takes about half an hour.
- You'll paste three commands into Terminal. Everything after that is done by clicking in a web page.
- Two pop-ups will appear during setup. Say yes to both — one of them is the single most common reason people get stuck.
- You'll pair with Apple Home before adding any devices, so if anything is wrong you find out in ten minutes rather than two hours.
Homebridge on Windows
You can install Homebridge straight onto Windows and plenty of people run it happily. But there is one known problem, and it is better to know before you start:
Homebridge's own documentation warns that some iPhones cannot connect to Homebridge running natively on Windows 10 or 11. The install looks perfectly successful, and then the pairing step simply never finds the bridge. It isn't a setting you can change, and nobody can tell you in advance which side of that line your network falls on. The official advice is to run it on Linux instead.
So here's the sensible approach: try it — you'll know inside ten minutes, because pairing is deliberately step 5, before you've invested any effort in plugins. Uninstalling takes one command and leaves nothing behind.
If pairing does fail, don't fight it. A Raspberry Pi is the well-trodden road for Windows households: about £50, no command line whatsoever, and it can sit in a cupboard drawing less power than a phone charger.
Homebridge on a Raspberry Pi
The easiest route, and the one we'd suggest to anyone without a Mac. The Homebridge team publish a ready-made image, so there is no typing and no Terminal — you write it to a memory card with an ordinary app that has buttons.
- What to buy: a Raspberry Pi 4 or 5, its official power supply, and a microSD card (32 GB is plenty). Around £50–£75 all in.
- What you do: install Raspberry Pi Imager on your Mac or PC, choose the Homebridge image, write the card, put it in the Pi, plug the Pi into power and — ideally — an Ethernet cable.
- Then: open the Homebridge dashboard in your browser and rejoin this guide at step 4. Steps 1 to 3 are the bit you've just skipped.
- It sips electricity, so leaving it on permanently costs pennies, and nothing else on your desk gets disturbed.
Homebridge needs a computer that stays on
Homebridge only helps while it's running, so an always-on host isn't optional. That sounds like bad news and usually isn't, because the cheapest option is also the best one for this job. In rough order of what we'd suggest:
- A Raspberry Pi (~£50). Set up with a normal app, no command line, lives in a cupboard, costs pennies a year to run. It isn't a computer you use — it's an appliance you forget about.
- A NAS you already own. Synology and QNAP boxes are already on all the time and both can run Homebridge. If there's one in the house, that's your answer.
- Check for a hub from the brand itself. Some manufacturers sell a bridge that speaks HomeKit natively — Philips Hue's bridge is the best-known example. If your devices have one, it beats Homebridge outright: no computer, no maintenance, no pairing quirks. Worth ten minutes of searching before you buy anything else.
- Or let it go for now. Theatrium is still worth having on whatever is in Apple Home, and Apple TV-only mode gives you weather, radar, webcams, markets, news, a calendar, the clock and the full visualizer with no smart home at all.
How it works
Where Homebridge fits
One picture is worth the whole explanation. Homebridge adds a single translating hop, and everything downstream of it carries on exactly as before.
The install
Nine steps, in order
Pick your computer and the page will show only the instructions that apply to you. Please don't skip ahead — step 5 is a deliberate checkpoint that catches problems while they're still cheap to fix.
Every step is tagged with what you need in your hands. Most of the work happens at the computer, but pairing needs your iPhone as well, naming your accessories is done on the iPhone alone, and the last step is on the Apple TV itself.
Install Node.jsYour computer
Homebridge is written in JavaScript, and Node.js is the thing that runs it. It's a normal, signed installer from a long-established project.
- Go to nodejs.org and download the LTS version — LTS means "long-term support", the stable one. Take the
.pkginstaller for macOS. - Open the downloaded file and click through, entering your Mac password when asked.
- Now open Terminal: press
⌘ Space, typeTerminal, press Return. A window of plain text appears — that's where things get pasted.
- Go to nodejs.org. Download the LTS version. Choose the Windows
.msifile. - Open the file you downloaded. Click Next on every screen, then Install. You do not need to change any settings.
- Now you need a black window called the Node.js command prompt. This is where you type commands. To open it:
- Click the Start button.
- Type
Node.js command prompt. - Right-click it in the list, and choose Run as administrator.
- Windows asks if you are sure. Click Yes.
A black window opens. Leave it open. Every command on this page gets typed there.
Right-clicking and choosing Run as administrator gives the window permission to install things. Without it, the next step fails. If you close the window and need it again later, open it the same way.
node -v
✓ You should see a "v" and some numbers, like v22.14.0. Any version number means it worked. If you get command not found or not recognized, close the window, open a fresh one and try again — the installer's changes only reach newly opened windows.
Install Homebridge itselfYour computer
One command fetches Homebridge and its web dashboard — the friendly screen you'll use for everything from here on.
sudo npm install -g homebridge homebridge-config-ui-x
sudo chown -R $(id -u):$(id -g) ~/.npm
It will ask for a password. This is your Mac login password — the one you use to unlock this computer. As you type it, nothing appears on screen: no dots, no stars, no cursor movement. That's normal, not a fault. Type it and press Return.
Installing with sudo leaves files owned by root in your npm cache. The dashboard installs plugins as you rather than as root, so it can't write there, and your first plugin install at step 6 dies in a wall of red EACCES text with no obvious cause. The second line hands the cache back to you and takes about a second. Fixing it here costs nothing.
Installed Node with Homebrew rather than the installer in step 1? Then drop sudo from the first line entirely. Homebrew's folder already belongs to you, and using sudo on it is what creates the problem above.
Click Copy below. Then click once inside the black window and press Ctrl and V together to paste it. Press Enter.
npm install -g homebridge homebridge-config-ui-x
Text scrolls past for a minute or two. Wait for it to stop.
✓ A minute or two of scrolling text, ending in a summary of added packages with no red ERR! lines. Yellow warnings are fine and can be ignored.
Homebridge's own macOS guide writes this command with --unsafe-perm in it. You don't need it, the command above installs cleanly without — but adding it does no harm if you'd rather match their wiki word for word.
Set it to start by itselfYour computer
This turns Homebridge into a background service, so it starts with the computer and keeps running with no window open.
sudo hb-service install
Your Mac login password again, for the same reason. Still invisible as you type.
On macOS Sequoia and newer, a box appears asking whether node may find devices on your local network. Click Allow. If you miss it or click Don't Allow, Homebridge runs perfectly but is completely invisible to your iPhone, with no error message to explain why. You can set it at any time: System Settings › Privacy & Security › Local Network, then switch node on.
Same black window. Copy, paste with Ctrl and V, press Enter.
hb-service install
Windows asks whether to allow Node.js JavaScript Runtime through the firewall. Tick Private networks, then click Allow access.
This one matters. If you click Cancel, everything still looks fine, but your iPhone will never find Homebridge later. If you clicked the wrong thing, troubleshooting shows how to change it.
✓ The text ends by telling you Homebridge is installed as a service, and gives you a web address. It's now running.
Open the dashboard and make your loginYour computer
Good news: the command line is finished. Everything from here happens in a browser. There are three screens, and they go quickly.
- On that same computer, open Safari, Chrome or Edge and go to
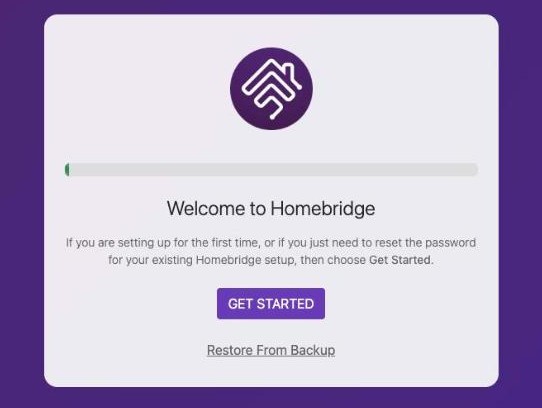
http://localhost:8581 - You land on Welcome to Homebridge. Click Get Started.
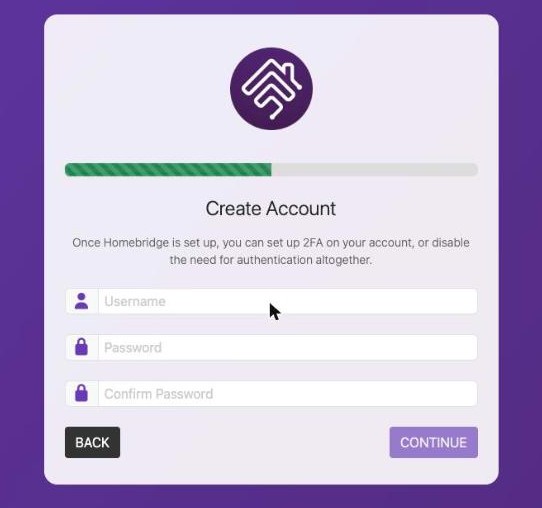
- On Create Account, invent a username and password and type the password twice.
It is not your Mac login password, and not your Apple ID. You are inventing a fresh one, here, now, and it only ever unlocks this dashboard. Write it down. There is no "forgot password" email, because there is no email and no account anywhere — this login exists solely on your own machine.
- Congratulations appears. Click Continue and you arrive at the dashboard.
✓ You're looking at the Homebridge dashboard: a status panel, a QR code, and a menu down the left. This page is your control center from now on — bookmark it.
You may see a panel reading Matter Not Enabled, and an amber dot beside Node.js while everything else is green. Neither is a problem and neither needs your attention now. The amber dot means a newer Node.js exists; step 9 covers when to act on it.
localhost only works on the computer itself. From your phone or another laptop, use that computer's address on your network instead, like http://192.168.1.42:8581 — the dashboard's status screen shows you the right one.
Pair with Apple Home — now, before adding any devicesComputerand iPhone
This is the checkpoint. Pairing is the step most likely to fail, and it costs nothing to test while your setup is still empty.
- ComputerThe dashboard's status screen shows a QR code. Leave it on screen — you are about to photograph it with your phone. Underneath it you'll see Not Paired, which is exactly right at this point.
- iPhoneOpen Home, tap + › Add Accessory, and point the camera at the code on your computer screen.
- iPhoneYour iPhone will warn you this is an Uncertified Accessory. Expected — Homebridge isn't a commercial product with Apple's license. Tap Add Anyway.
- iPhoneGive it any room. It's only the bridge itself, not something you'll interact with.
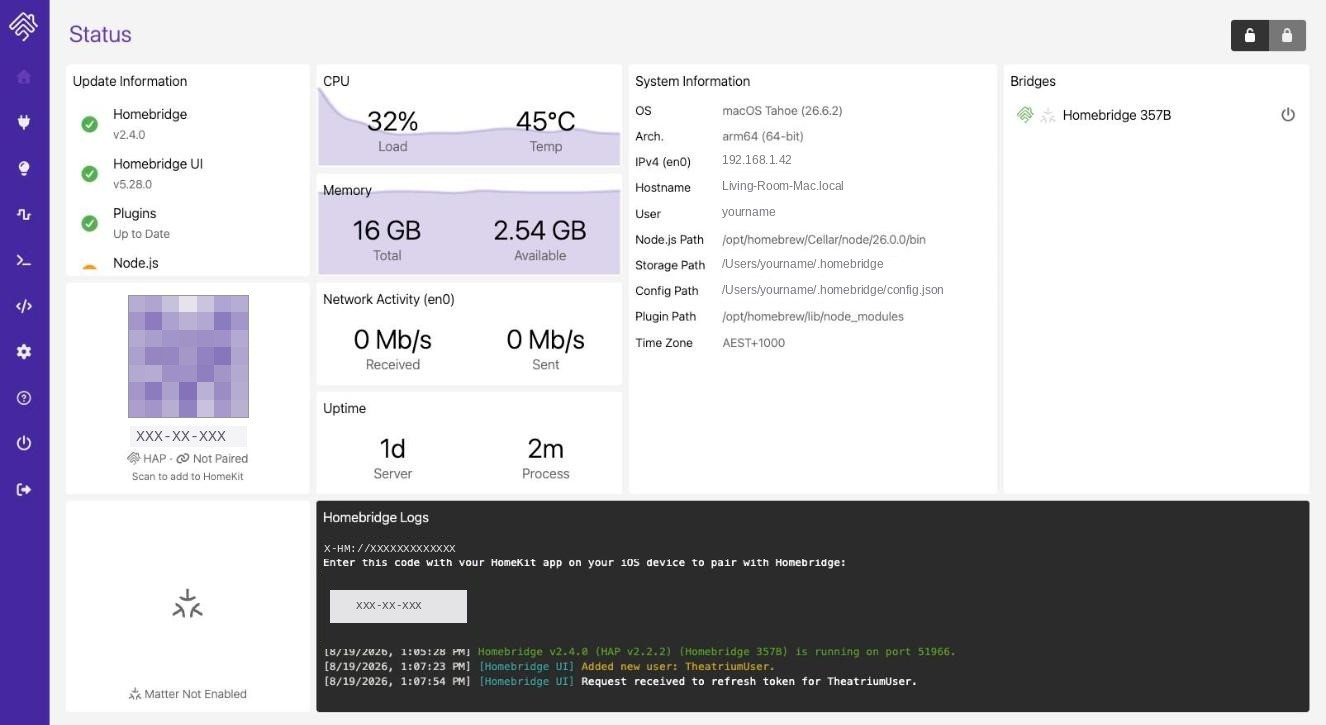
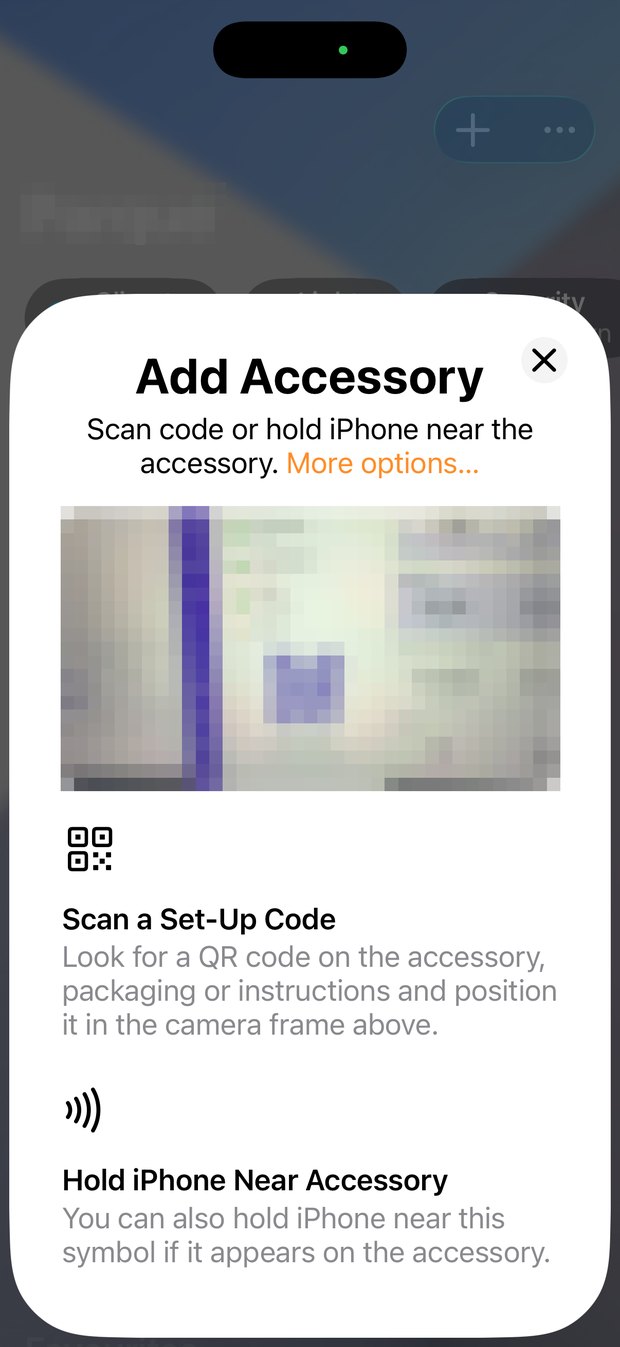
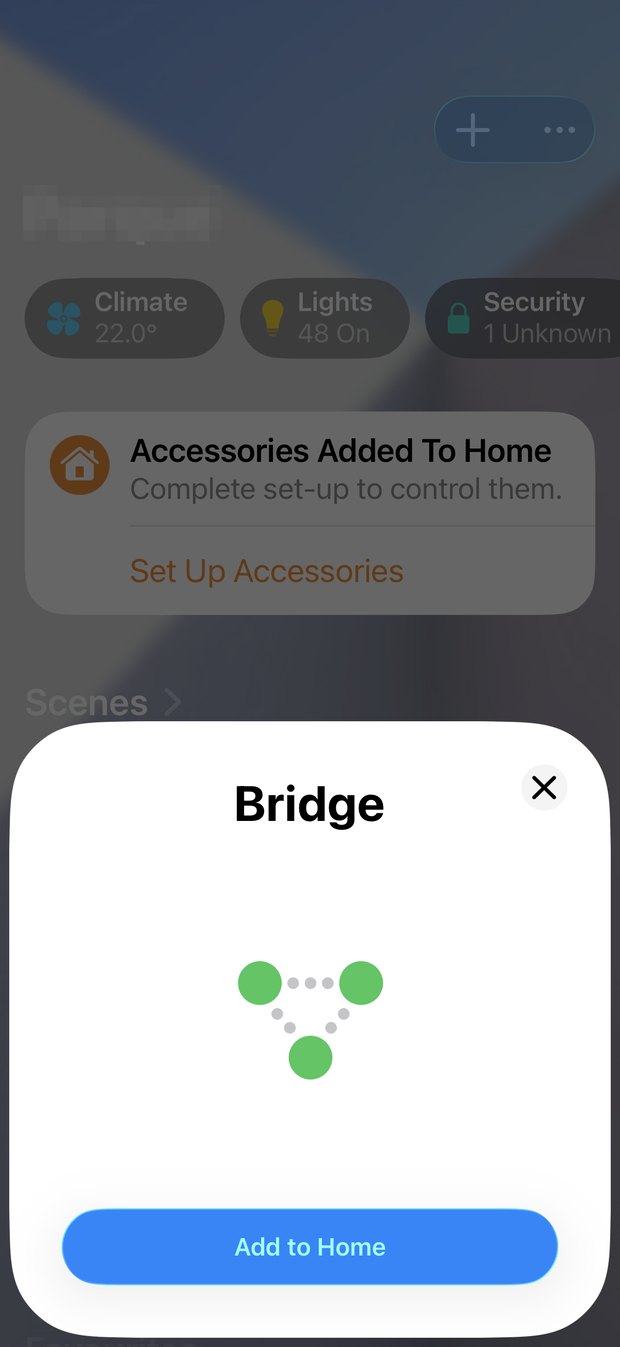
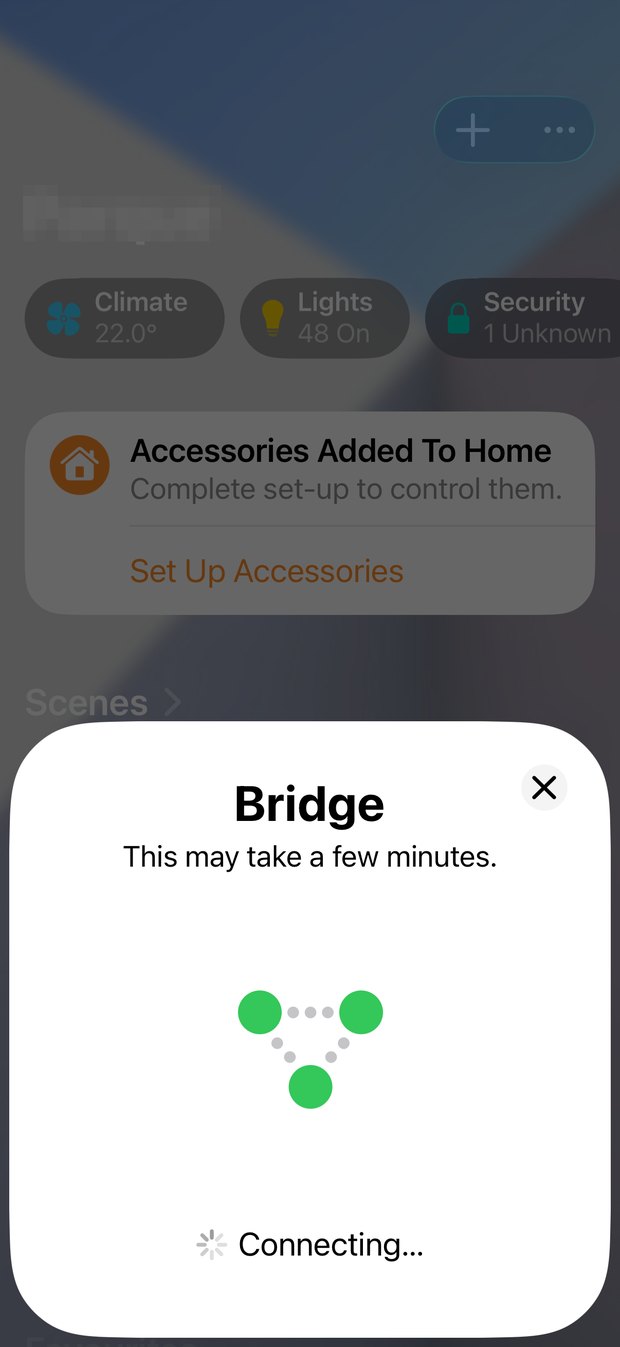

✓ "Homebridge" now appears in your Home app, and the dashboard's status screen changes from Not Paired to Paired. Stop and confirm this before going on.
Don't add devices and hope it settles down — it won't. Go to When something goes wrong and work through My iPhone can't find Homebridge. On Windows, this is also where you learn whether the native-Windows limitation affects you.
Add your devices, one plugin at a timeYour computer
A plugin is a small add-on that teaches Homebridge to speak to one brand. All of this is clicking — no more commands.
- Click Plugins. Search for the brand of your device:
tuya,ring,tado,broadlinkand so on. If your lights are Tuya or Smart Life, use the box below instead — it names the exact plugin to pick. - Find your plugin in the list of results. There is no Install button on the row. At the end of the row there is a small down arrow. Click that arrow, and a short menu drops down. Choose Install from it.
This is the step almost everyone gets stuck on. The arrow is small and it does not look like a button, so people search the page for the word Install and never find it.
- It asks which version you want. Choose latest. Never choose beta.
- A settings window opens and asks for your account with the device maker. That is a different login from the two you have already used. Read what the screen is asking for.
- Click Save. The plugin then fetches your devices. When it has them, Homebridge offers to restart — say yes.
- Check that plugin worked before adding another. One at a time means you always know what broke.
This is the most common case by far. Tuya makes the electronics inside hundreds of products sold under other brand names. If your device came with an app called Smart Life or Tuya Smart, this is you.
Searching tuya brings up more than a dozen plugins. Most of them make you register a developer account with Tuya, which is a long detour. Ignore those. Use this one:
homebridge-tuya-without-developer-account
It signs in with a QR code, like a phone app. No developer account, no codes to copy out, and it never asks for your Tuya password. We have installed it twice, on a Mac and on a Windows PC, and watched it load a house full of Tuya lights and switches both times. It is not on Homebridge's verified list, so you should know that, but it is the one that works.
Signing in, step by step:
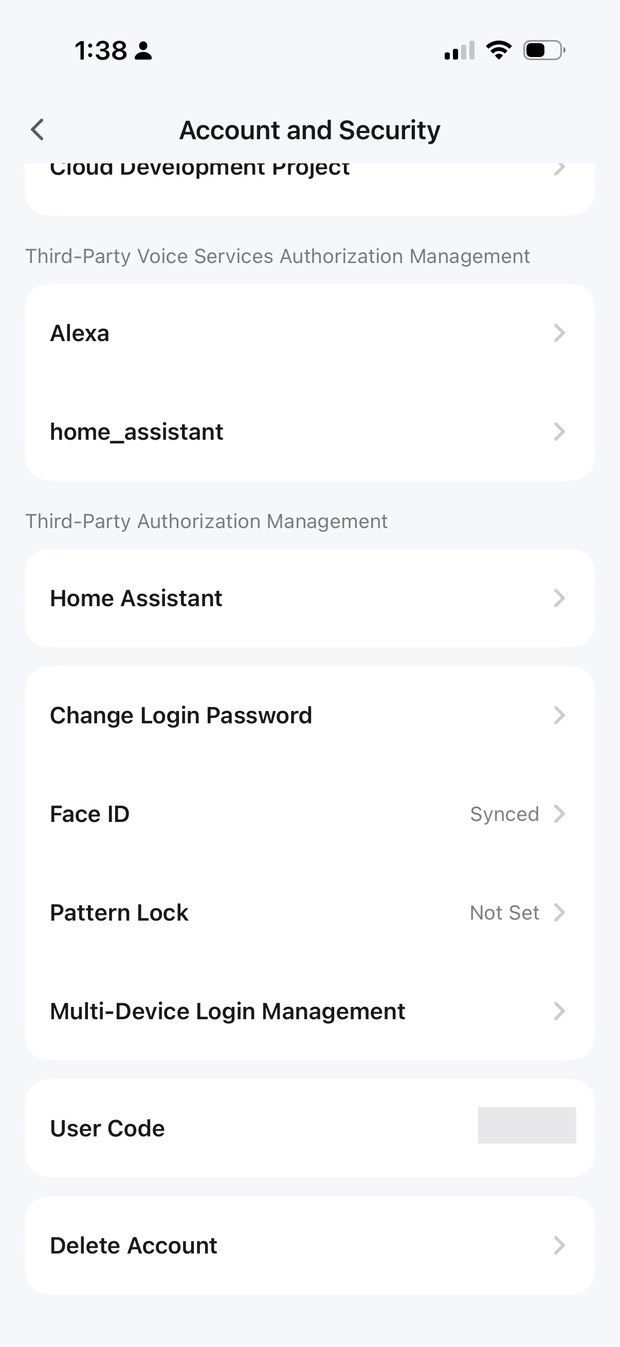
- iPhoneOpen Smart Life or Tuya Smart. Tap Me, then Settings, then Account and Security. Write down the short User Code you see there.
- ComputerIn the plugin's settings, type that code into the Tuya User Code box. Click Generate QR Code.
- iPhoneScan the code using the Smart Life app. Not the camera app, not the Home app. Then tap Confirm login.
- ComputerClick Save Configuration.
- ComputerThe plugin now goes and fetches your devices. Give it a moment. When it has them, Homebridge offers to restart — say yes. If you do not see the offer, restart it yourself from Power Options › Restart Homebridge.
✓ After the restart, your Tuya devices appear in the Home app on your iPhone. Nothing appears before the restart, however long you wait.
While the QR sits on screen unscanned, the plugin shows E0020003 Login failed, please scan and try again! in a box underneath it. That is simply what waiting looks like — it is asking Tuya every few seconds whether you have approved yet, and reporting that you haven't. Do not regenerate the code. Scan the one already on screen, and the message changes to QR approved by itself.
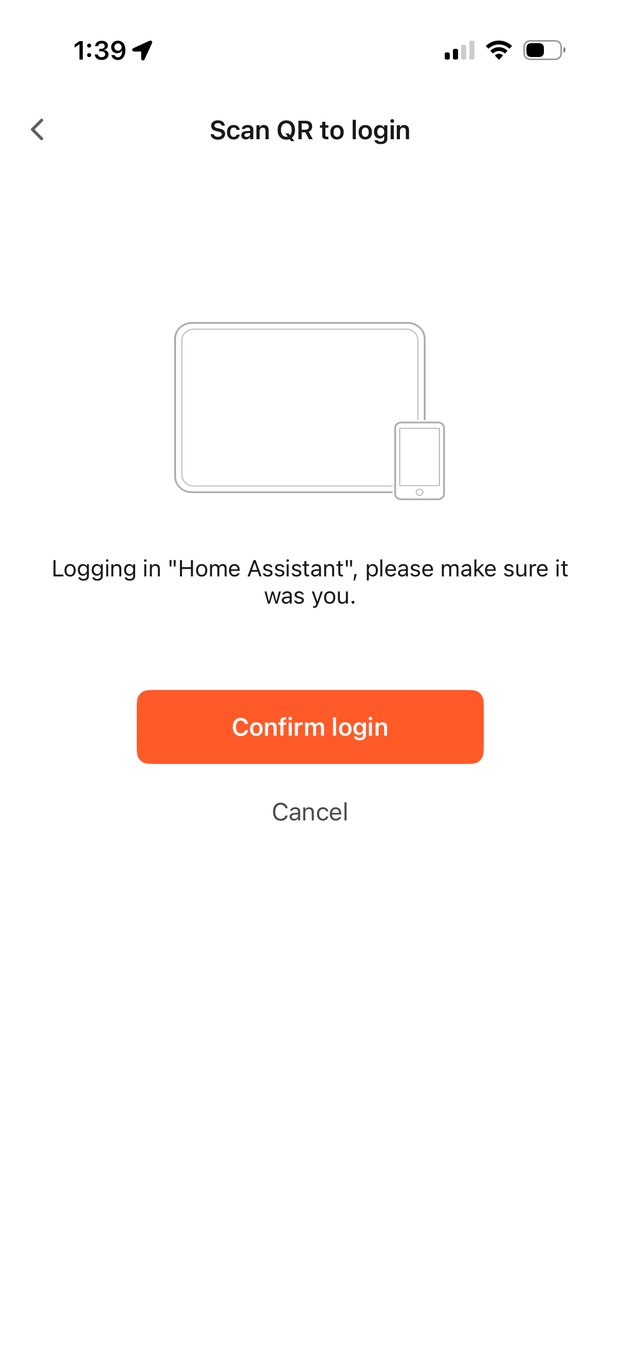
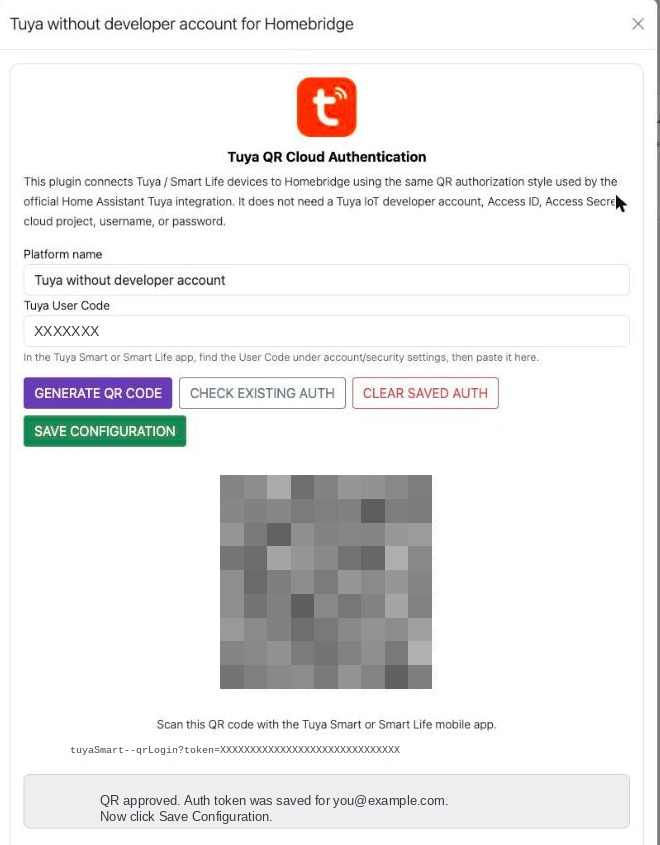
Devices will not appear until you have done both the Save Configuration and the restart. Approving the QR only stores a token; it doesn't load anything.
✓ Your devices appear in the Home app within a minute of the restart, and you can switch them on and off from there.
One rule worth keeping: never edit config.json by hand, and never open it in a word processor — smart quotes and auto-formatting corrupt the file and Homebridge will refuse to start. Everything you need is in the dashboard's own settings screens.
Put every accessory in a roomYour iPhone
This is the step people skim, and it is the one that decides whether the whole exercise worked. Theatrium builds its dashboard out of Apple Home's rooms. An accessory with no room has nowhere to appear, so it simply doesn't.
A bridge doesn't know your house. However many accessories it imports — and a Tuya account can easily bring forty — they all land in a single default room, exactly as shown below. Nothing is broken; nothing is sorted either. Until you assign rooms, Theatrium has forty things and nowhere to put any of them.
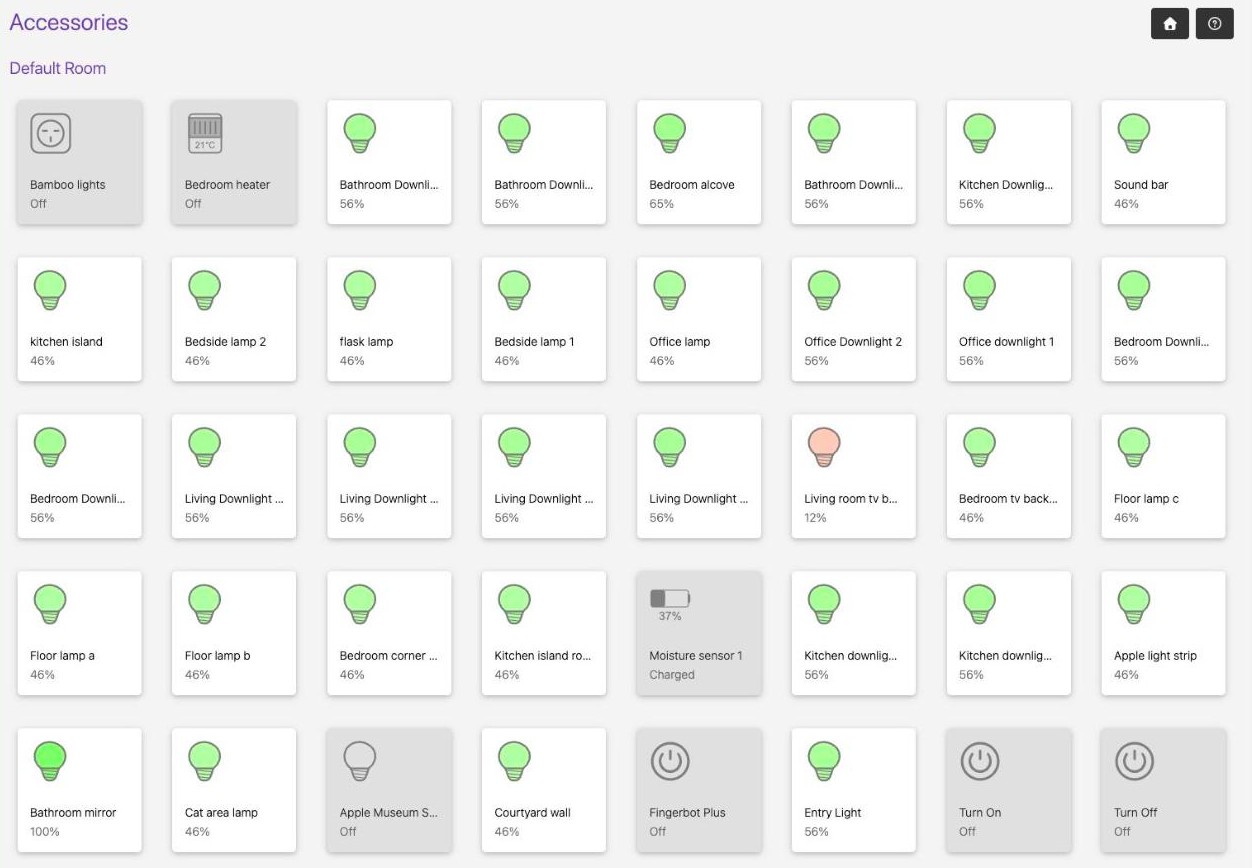
- iPhoneGive every accessory a real room in the Home app. This is the one that matters. If you do nothing else here, do this.
- iPhoneWork through it in one sitting rather than a few at a time. In the Home app, long-press an accessory, open its settings and set the room; consecutive accessories from the same bridge are usually listed together, which makes it quicker than it sounds.
- iPhoneRename anything cryptic.
TY-0x8813-Socket-2becomes Reading Lamp. These are the names you'll be reading from across the room. - iPhoneTheatrium's Light Sync drives two colors, one for overheads and one for lamps, so it helps to split your lights sensibly between the two.
✓ Every accessory sits in a real room with a name you'd recognise. Nothing is left in the default room.
Point Theatrium at Apple HomeYour Apple TV
Now connect Theatrium.
- Open Theatrium on your Apple TV. On first launch, choose Apple Home on the "Choose your backend" screen. Already past setup? Settings › Connections and switch the data source.
- tvOS asks permission once — accept it. First load takes ten to twenty seconds while your accessories stream in.
- Your rooms, lights, climate, cameras, locks, covers, sensors and scenes appear — the Homebridge ones now among them.
- Set up Light Sync in Theatrium's settings and tune the intensity to taste.
✓ The device that started this whole exercise is on your TV, and you can control it from the sofa.
Make it stay workingYour computer
Homebridge only helps while it's running. Ten minutes now prevents the most common complaint of all: "it worked yesterday".
- Stop it sleeping. System Settings › Energy (or Battery › Options on a laptop) › turn on Prevent automatic sleeping when the display is off. On a desktop Mac, also enable Start up automatically after a power failure.
- Log in automatically. System Settings › Users & Groups › Automatic login. Without it, Homebridge may not come back after a power cut until somebody types a password.
- Closing a MacBook's lid suspends Homebridge. Leave it open, attach an external display, or use a desktop Mac.
- Stop it sleeping. Settings › System › Power › set Sleep to Never when plugged in.
- Windows Update restarts interrupt Homebridge. Set your active hours so restarts land when nobody's watching Theatrium.
- Homebridge runs as a Windows service, so it starts at boot without anyone signing in.
- Turn on backups. In the dashboard: menu › Backup/Restore › Scheduled Backups. A backup restores your plugins, your settings and your Apple Home pairing, so you never have to re-add every accessory by hand. This is the most valuable five minutes on this page.
- Update occasionally. The dashboard tells you when Homebridge, a plugin or Node.js has an update. Do Homebridge and plugins first, Node.js only when the dashboard specifically asks — and take a backup before any of it.
- Give the computer a fixed address in your router settings (a "DHCP reservation" or "static lease"), so the dashboard is always at the same address.
Troubleshooting
The eight most common problems
Nearly every failed setup is one of these. Work down in order — the earlier ones are more common and quicker to rule out.
Nothing loads at localhost:8581
Homebridge isn't running. Ask it directly:
sudo hb-service restart
hb-service logs
hb-service restart
hb-service logs
Read the last twenty lines or so. Homebridge is usually explicit about what upset it, and the culprit is very often the most recently added plugin. Press Ctrl + C to stop watching the logs.
Also check the number: it's 8581, not 8851 or 8518.
My iPhone can't find Homebridge when I try to pair
This is the most common problem. Try these in order — each is a genuinely different cause.
First, work out which failure you have. Open the dashboard's log window and watch it while your iPhone is searching. If the phone is reaching Homebridge you will see activity appear. If the log stays completely silent — nothing but your own dashboard's routine entries — then the phone never found the bridge at all, and no amount of waiting will change that. A spinner that turns for more than a minute or two with a silent log is a discovery problem, not a slow connection. That distinction saves you working through fixes for the wrong fault.
- Same network? Your iPhone and the computer must be on the same Wi-Fi — not a guest network, not an IoT-only network. Separate 2.4 GHz and 5 GHz names on the same router are usually fine; separate networks are not.
- Any VPN running? Including one you forgot counts as a VPN. Turn it off on the iPhone first, then the computer, then retry. VPNs block the discovery traffic pairing depends on. Tailscale is the one that catches people — it is a VPN, but it sits quietly in the background with nothing to click, so readers answer "no, I don't use a VPN" and move on. If you run Tailscale, ZeroTier, Cloudflare WARP, NextDNS or a work VPN profile, that is a yes. Tailscale's MagicDNS can also take over
.local, which is the namespace this all runs on. Turn them back on once pairing succeeds; a paired bridge is far more tolerant than the pairing itself. - Mac only — Local Network permission. System Settings › Privacy & Security › Local Network › make sure
nodeis on. This silently breaks pairing and is the most common Mac cause by a wide margin. - Windows only — firewall. Control Panel › Windows Defender Firewall › Allow an app through firewall › find Node.js JavaScript Runtime and tick Private. If it isn't listed, add it.
- Change how Homebridge announces itself. In the dashboard: menu › Settings › Homebridge Settings › mDNS Advertiser. Switch from Ciao to Bonjour HAP (or back), restart, try again. Free, quick, and it fixes a surprising share of cases.
- Windows only — install Apple's Bonjour. Some Windows users report success after installing Apple's Bonjour Print Services for Windows, which adds Apple's own discovery service to the machine. Worth a try before giving up.
- Router features. Look for anything called AP isolation, client isolation or IGMP snooping, and turn the first two off. Mesh kit from different manufacturers mixed together is a known source of this.
On Windows, know when to stop. If you've worked through all of the above on a native Windows install and your iPhone still can't see the bridge, you've most likely hit the documented Windows limitation — Homebridge's own guide warns about exactly this and recommends Linux instead. It isn't your fault and no setting will rescue it. Uninstall and move to a Raspberry Pi.
The Home app says it's already added, or pairing won't take
This happens after a reinstall, or when an earlier attempt half-succeeded: Homebridge and your Home app disagree about whether they know each other.
- In the Home app, remove any existing Homebridge accessory.
- In the dashboard: menu › Settings › Unpair Homebridge / Reset Pairing, then restart Homebridge.
- A fresh QR code appears — pair again from step 5.
Your plugins and their settings survive this. Only the Apple Home pairing resets, so you may need to reassign rooms afterwards.
A plugin won't install: red EACCES errors
The install window fills with red text mentioning EACCES, and somewhere in it a line reads "Your cache folder contains root-owned files". Nothing is wrong with the plugin — every plugin would fail the same way.
The cause is earlier: Homebridge was installed using sudo, which left files owned by root in your npm cache. The dashboard installs plugins as you, not as root, so it cannot write there.
sudo chown -R $(id -u):$(id -g) ~/.npm
Then click Install again in the dashboard. No restart needed, and nothing else is affected. This is the same fix npm itself suggests in the error text, written so you don't have to copy the numbers out of it by hand.
On Windows this appears when the Homebridge service is running with fewer rights than the account that installed it. Close the Node.js command prompt, open a fresh one with Run as administrator, and reinstall the service:
hb-service uninstall
hb-service install
Your config and plugins are kept. Then try the plugin again.
Devices show as "No Response" in the Home app
- Is the computer awake? Overwhelmingly the usual answer. Revisit step 9.
- Did the computer's network address change? Give it a fixed address in your router.
- Is one plugin dragging everything down? Open that plugin's settings, look under Bridge Settings and enable Child Bridge. It then runs in its own process, so its problems stay its own. You'll need to pair that child bridge in the Home app, exactly as in step 5.
- Is your Apple TV acting as Home Hub? Check Home Settings › Home Hubs & Bridges in the Home app — you want this Apple TV listed as Connected.
Devices are in the Home app, but Theatrium doesn't show them
- Assign a room to every accessory. Theatrium builds its dashboard from your rooms, so a roomless accessory has nowhere to appear. This fixes it the overwhelming majority of the time, and it is especially likely if you have just added a bridge: everything a bridge imports arrives in one default room, so a large import means dozens of accessories that are visible in the Home app and invisible to Theatrium. See step 7.
- Force-quit and reopen Theatrium so it re-reads your home.
- Confirm Theatrium's data source is Apple Home — Settings › Connections.
- If a device is in the Home app, in a room, and Theatrium still doesn't list it, that's worth telling us about — some accessory types don't have a card yet.
It worked yesterday and now it doesn't
In order of likelihood: the computer slept or shut down; an update restarted it mid-flight; the network address changed; a plugin auto-updated and broke. Restart first, then read the logs — they cover all four.
sudo hb-service restart
hb-service restart
I want to undo all of this
It comes off cleanly. See Removing it all below for the full sequence, including the two steps that uninstall commands don't cover.
Undoing it
Removing it all
Homebridge comes off cleanly and leaves nothing behind. Four steps, in order. The last one is the only one that matters for your privacy, and no uninstall command does it for you.
Show me how to remove it
Remove the bridge from Apple HomeYour iPhone
In the Home app, remove the Homebridge accessory first. If you uninstall the software before doing this, the accessory is orphaned and sits in your Home app showing No Response permanently, with nothing left to talk to.
Uninstall the service and the softwareYour computer
sudo hb-service uninstall
sudo npm uninstall -g homebridge homebridge-config-ui-x
hb-service uninstall
npm uninstall -g homebridge homebridge-config-ui-x
Delete the configuration folderYour computer
The commands above remove the program but deliberately leave your settings, in case you're reinstalling. To clear them out as well:
rm -rf ~/.homebridge
rmdir /s /q "%USERPROFILE%\.homebridge"
Keeping it costs nothing and makes a future reinstall trivial — the folder holds your plugin list, your settings and your Apple Home pairing. Delete it only if you want a genuinely clean slate.
Revoke what you authorisedYour iPhone
If you signed in to a plugin with a manufacturer account, that grant lives on their servers, not yours. Deleting the configuration folder removes your copy of the token; it does not withdraw the permission. Until you revoke it, a bridge that no longer exists still has standing access to your account.
For Tuya or Smart Life, open the app and go to Me › Settings › Account and Security, find the authorised app or device, and remove it. Other brands bury the same setting somewhere similar. Do this for every plugin you gave an account to.
Node.js can be uninstalled like any other application if you don't want to keep it. Nothing about your existing Apple Home, your Apple TV or Theatrium is affected by any of the above — accessories that were already HomeKit-native carry on exactly as before.
Keeping it safe
Four house rules
- Never share your pairing QR code or setup PIN. Anyone who has either and can reach your network can add your home to their own Home app. It only matters if you post it somewhere public — see below before pasting logs into a forum.
- Never open port 8581 to the internet. The dashboard is designed for your home network only. To reach it while away, use your home network's own VPN — don't forward the port on your router.
- Judge plugins before installing them. They're written by volunteers and run with real access to your accounts. Prefer Verified ones, check when they were last updated, and be wary of anything asking for credentials to something valuable.
- Take a backup before every change. One click in the dashboard, and it turns a bad evening into a two-minute fix.
Still stuck
Where to get help
Homebridge problems — installing, plugins, pairing, a device that won't reach the Home app — are best taken to the Homebridge community, who know their own software far better than anyone else does. Theatrium problems — something is in your Home app and in a room but doesn't show on the TV, or Light Sync isn't behaving — come to [email protected] or r/TheatriumApp.
One thing worth saying plainly: Homebridge is an independent open-source project — not part of Theatrium, not affiliated with or endorsed by us, and nothing to do with Apple. This guide is unofficial: it's written from our own experience getting Homebridge working alongside Theatrium, and shared only in case it saves you some time. Full credit and thanks go to the Homebridge maintainers and contributors, who build and freely give away the software this page relies on. We're glad to help you get it talking to Theatrium, but we don't control it, and a plugin that stops working is between you and that plugin's author.
Commands and warnings on this page follow the official Homebridge installation guides for macOS and Windows. Homebridge changes over time — if something here disagrees with the official wiki, trust the wiki.
This guide is general information, provided “as is” with no warranty of any kind. It describes independent third-party software that Theatrium does not control, and the steps involve installing software and changing settings on your own equipment — back up first and proceed at your own risk. Read the full disclaimer.